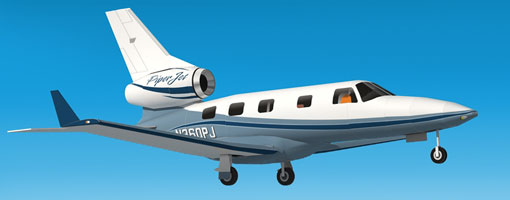
Usually I build the RC plane first and then later I release the papermodel version of it, but often I became lazy and it never happened. So this time I made the paper version first. This model is a single engine very small corporate jet from Piper Aircraft Inc, a PiperJet. I found this plane very beautiful and I want to make an RC plane of it. I love their Cherokee, I already made an RC of it and it flew so good very easy to handle. Sadly this Piper PA-47 PiperJet never went into production, the project ended after they made a prototype and first flew on 2008. They even redesigned the PiperJet and then came PiperJet Altaire, but once again they cancel it due to economic conditions on 2011. I made this papermodel in 1/33 scale, the model will have 40 cm or 16 inches wingspan.

Roll part no.7 into tube shaped fuselage and then put 2 formers part L inside it, with a little bit on both the edges. The former purpose is to maintain the form of the fuselage. Make sure the dotted guide line is align with the fuselage seam. Use cardboard for the formers and 160 gram paper for the fuselage (skin).

This papermodel uses inserted glue tabs, which are represented with letters on the last page of the template. You need to glue the gluetabs on the inside side of the compliment part. For example : 2+A, it means you need to glue part A on the inside edge of part 2, before you can glue it with part 1. You can use 160 gram paper for the skin part and 80-100 gram paper for the insert glue tabs.
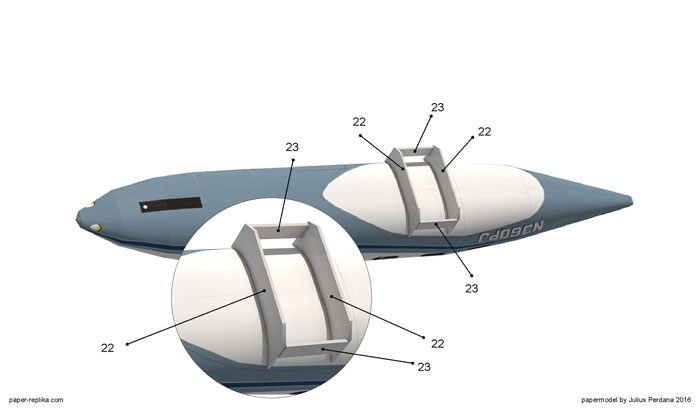
Part 22-23 function as the reinforce structure for the plane's belly so the wing will have a rigid platform to glue on to. Use cardboard 1 mm thickness for the formers/ structures. It is important to make this set rigid and strong.
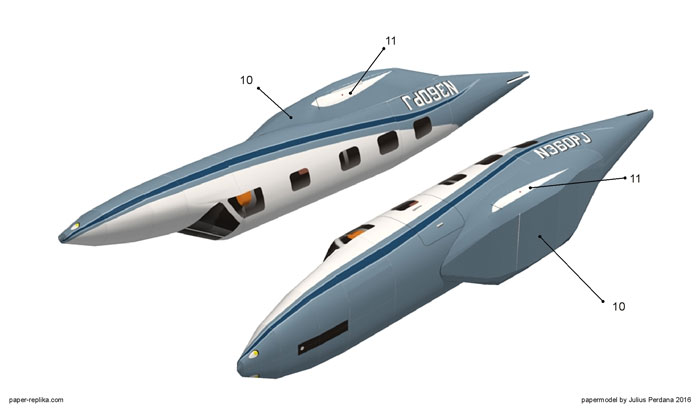
Assembly the plane's belly first before wrap it around on the bottom of the fuselage. It is important to glue inside part 11 and the rest if belly part that contacted with onto the cardboard structures, and make it rigid.

Make sure to assembly part 18 and 19 inside part 16 before continuing to assembly the rest. The same as how to assembly the fuselage part, do the same on the jet engine parts. Put cardboard part M inside part 38 and wrap it around, this is the horizontal stabilizer part. Insert the horizontal stabilizer in the slit on the tail section of the fuselage and glue it.

Put reinforce part 26 and former part 25 on to the back side of part 26 (bottom side wing), and then cover and close it with part 27. Assembly the other side of the wing as well.
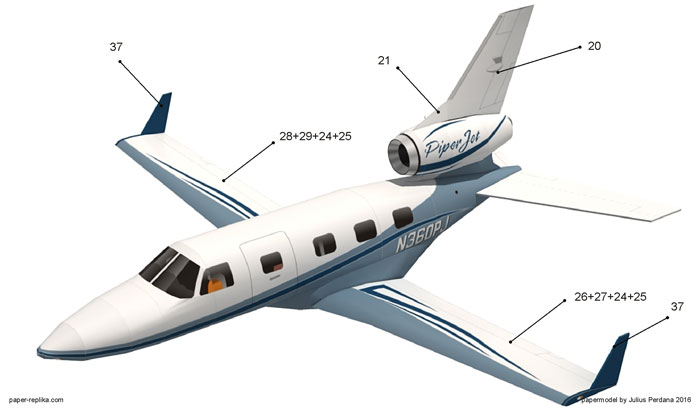
Once both wings are ready, glue it on the side of the plane's belly. The wing should be a slightly dihedral, so just like I said before it's important to make the belly part rigid so the wing will have the strong and rigid platform to cling to. Complete both wing with winglets (part 37). Attach the vertical stabilizer or fin, part number 20 and 21.
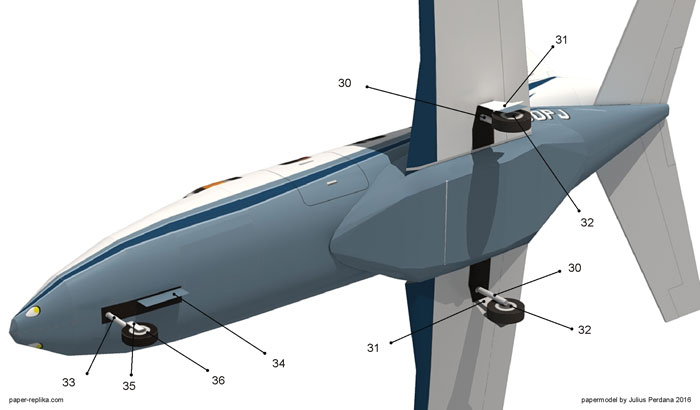
Now the landing gears. you need to poke and make a hole on the bottom nose part and insert the small paper tube as the front landing gear strut all the way above until it touch the upper inside part of the nose. You need to put a glue on the one side of the tube before doing that. Do the same for the both wings. The model is finish.


